Monday, January 30, 2017

GLOBAL DESIGN PROJECT #072

This week we are casing the gorgeous and super talented Krista Fratin.

Krista's design is a great one to work from and even though at first glance it appears quite simple it actually gives you a lot of scope.  If you look a little closer though you can see all of the elements that make this such a beautiful card and one of my absolute favourites has to be the stitching.

I decided to create a Valentine's Day themed card and used Jar of Love in conjunction with Foxy Friends.  I had already created my little bobble headed fox a couple of days ago and so he was perfect for this project.


I've added a strip of stamped hearts along the inside.


And, here is my little bobble head in action.  This is the first time I've uploaded a video and although it's a little small you can see little foxy in action.

SO VERY MUCH

Available now as a free stamp set during Sale-a-bration and I just love the font used for this large thank you stamp.

A while ago I experimented with some water colour paper and ink and created some brightly coloured backgrounds which I though might be ideal for a simple but effective thank you card. 


Because the water colour paper is quite textured I used my MISTI to stamp this image multiple times until I was satisfied with the intensity of the black Memento ink.  I was able to position both the sentiments and stamp them the same time.  The MISTI is a really handy tool and once you have the stamps positioned it so easy to knock up a stack of these card for future use.

I decided to create another similar card using Mint Macaron and copper embossing powder but this time I used one of my inked up acrylic blocks to stamp on the water colour paper creating a softer background.  Because I was going to emboss my sentiment I needed to make sure the background was thoroughly dried with my heat gun and it got a good working over with the embossing buddy too.


Wednesday, January 25, 2017

STAMPIN' UP AVANT GARDEN

Pantone has revealed it's colour for 2017 is named ‘Greenery’, it is described by Pantone as a “tangy yellow-green” often seen in foliage.

I've created a couple of cards using some Stampin' Up Greenery in it's honour.  I've used Mint Macaron, Wild Wasabi, Old Olive and Always Artichoke on both cards.  The greenery stamps from Avant Garden make a cute wreath and as I didn't want to used any other colours except neutrals on these cards, I stamped the flower in green too!


GLOBAL DESIGN PROJECT #071

This week's challenge is 3D and off the page projects which basically means make anything except for a card.

This week I created a gift for baby's nursery using the Made with Love stamp set and matching Baby's First Framelits dies.  It reminds me of the old fashioned washing lines that were common place in many backyards of Australia in the 50's.  There's nothing cuter than a baby onsie or two hanging on the line.

I used the Woodland embossing folder to create a subtle background and it and all the additional paper details are behind the glass which is deep set in the frame giving the appearance of distance.  Silver birch twigs and an extra hanging line are glued into the corners of the frame and on top of the glass to enhance the 3D effect.

It would be relatively easy to make a complimentary card as the design is pretty much already created.


Cardstock - Crumb Cake, Whisper White and Pool Party
Ink - Memento Black, Pool Party and Daffodil Delight
Made with Love stamps and Baby's First Framelits Dies
Woodland embossing folder, silver glimmer paper
Silver birch twigs from my garden, white twine and purchased frame.

Thursday, January 19, 2017

STAMPIN' UP DRAGONFLY DREAMS

I came across this photo that was shared on Pinterest via Flikr and it inspired me to create a card with the Dragonfly Dreams stamp set from Stampin' Up.  I improvised with the branch of leaves from Remarkable You because I don't have and plant type silhouette stamps.


All the images are stamped in Versamark and then embossed with Black embossing powder.

Cardstock - Whisper White, Night of Navy and Tempting Turquoise
Ink - Peek-a-boo Peach, Tempting Turquoise, Pacific Point, Night of Navy
Stamps - Dragonfly Dreams, Remarkable You
Versamark Ink, Black embossing powder, Black embroidery cotton for the string bow

Tuesday, January 17, 2017

#GDP070 GLOBAL DESIGN PROJECT


I encourage you to check it out, yes that's right, click on the blue link above and go there! See all the wonderful work created by the talented team and the submission by entrants from all over the world.  Follow the individual links to their blogs by clicking on the photos and don't just lurk, leave them a comment, I'm sure they'd love to hear from you. 

                                           
Well I have to say, Watermelon Wonder isn't one of my favourite colours but it's included on my card this week.  I usually find it hard to work with oranges and earthy tones and have never been a big fan of the 2015-17 In Colour range.  Dare I say it, the only colour I've really embraced (and ordered a pack of) is Tip Top Taupe.  I might just have to order a pack of Mint Macaron too now that I have used it with the Oh So Succulent bundle.

You know how it goes sometimes, you have a great idea, you stamp and fussy cut and it just doesn't work out and they're left laying around on your work space.  This is how I ended up with some cut outs of the little elephant from the Love You Lots stamp set.  Never one to throw my cutouts in the bin (yes I know,should cull, but after all that work) I decided to use one of them on my card this week. 

I chose this paper from the Carried Away DSP collection which adds a pop of colour and provides the perfect opportunity to use some Watermelon Wonder as an accent.  This colour combination would be a perfect choice for baby shower where the parents have chosen not to find out the sex of their baby and the little silver hearts add that tiny bit of bling.

I decided not to waste the card below which was initially created as a background for my elephant.  It seemed perfect for a Valentine's Day card with a difference. (i.e. not red or pink)


Cardstock - Smoky Slate, Watermelon Wonder, Night of Navy, Whisper White
DSP - Carried Away - Sale-A-Bration free choice item
Stamps - Love You Lots, Happy Happenings
Dies - Lots of Lables Framelits, Sunshine Wishes, Everyday Jars

Tuesday, January 10, 2017

HELLO YELLOW

I have to say Delightful Dijon is not one of my favourite colours and in fact I have a friend whose least favourite colour is yellow.  I have to keep convincing her we really do need yellow in the colour wheel. 

It's colour challenge week over at Global Design Project #069 and I've already blogged the card I made as my entry.   Here's a link if you want to check out the sample cards created by the design team.

http://www.global-design-project.com/2017/01/global-design-project-069-colour.html

Two of the colours were chosen for us and we had a Wild Card which allowed us to choose the third.

I got a little carried away and just continued on creating.  What can I say, I was on a roll.

Remarkable You.  I love this set and have finally added it to my collection. 

 I have snaffled Touches of Texture off my friend so I can have a play and get this set out of my system.  Can you see the Delicate Details lacey border?  This is one of the free sets you can earn during Sale-A-Bration.  Both the lace and the outside of this cared are sponged very lightly with Pool Party which is my third colour choice for this card.

  Kindness Matters - an oldie but a goody!  Combined with Pun Intended.  This card was a bit trickier to photograph because of the star sequin in the camera flash and the silver embossing powder.  I needed to angle it just right.

 Who doesn't love bees?  I know I do.  I actually drew this beehive shape to use as a pattern for a felt baby mobile which I made out of hand needled felt so it came in handy when creating my card.   This is the first time I've used the Hexagons Dynamic Textured Impressions Embossing Folder and I could tell straight away it was a lot thicker than our usual embossing folders.  Make sure you use the correct sandwich as this baby is very thick.  I used tab 1, embossing folder with cardstock inside and a cutting mat on top.  Just remember, if it doesn't roll through with ease, don't force it and check your sandwich.  The results with this folder are a very textured 3D effect which is very cool.

Cardstock - Whisper White, Basic Black, Silver
Ink - Delightful Dijon, Black, Pool Party
Embossing Powders - White, Black and Silver
Stamps - Remarkable You, Kindess Matters, Pun Intended, Delicate Details (SAB)

Monday, January 9, 2017

#GDP069 GLOBAL DESIGN PROJECT CHALLENGE

This week it's a colour challenge using Delightful Dijon, Silver and a third colour of your choice. Playing along is always fun and very inspirational.  Follow the link below to check it out.


I chose black as my third colour option and decided to use the Remarkable You stamp set that arrived in my recent order.  This is one of the stamp sets that has become more appealing to me the more I've seen it used.  I really love magnolias so I don't know why it took me so long to buy this set.

It's quite a simple card to make with some embossing and sponging finished off with a few drops of ink splattered off a paintbrush which are always good fun to do.

The magnolia flowers are embossed in black and both the front sentiment and leaves on the insert are stamped in Versamark ink and embossed with silver embossing powder.


This card is just a little bit too big for a C6 envelope so I guess I'll have to create my own with the Envelope Punch Board.  Have you downloaded the Envelope Generator?  It's a handy app. to help work out paper sizes and punch positions for one of a kind odd sized envelopes.  You can find it online.

Cardstock - Whisper White and Basic Black
Ink - Versamark with black and silver embossing powder, Delightful Dijon
Stamps - Remarkable You

Sunday, January 8, 2017

OH SO SUCCULENT FLOWER POT CARD

I came across a mini flower pot card on pinterest that led me to the website of Helen of H2Designs where I found a great tutorial.  Here's the link if you want to have a try. http://h2designs.blogspot.com.au/2012/07/mini-flower-pot-tutorial.html

I decided to use Oh So Succulent Bundle to create my topper instead of flowers. 

 Here is the finished flower pot which I have attached to a centre stepped card.

Just give the topper a tug to reveal a little message on the tab inside and of course there is room inside the main card for a more personal message.

 This side view shows you the valley and mountain folds that make this card so effective.

You can see there are various sized flower shaped dies in the set and I used three of them to create the succulents for my card which balanced them out nicely and gave the appearance of a full  pot of plants.  I used 2 layers of the smallest flower shaped die, 2 layers of the largest daisy shaped die and 2 layers of the smallest daisy die.

 
Cut from Old Olive cardstock before being sponged with Old Olive ink to give them a bit of depth and then shaped with my handy flower shaping tool.

Cardstock - Olive Olive, Crumb Cake, Whisper White and Very Vanilla.
Ink - Old Olive, Memento Black and Crumb Cake, Real Red
Succulent Garden DSP, Bee die from Detailed Dragonfly Thinlits, Copper embossing powder.
Stamps - Oh So Succulent and Avant-Garden which is a set you can earn during Sale-A-Bration.


Friday, January 6, 2017

STAMPIN' UP DRAGONFLY DREAMS

Dragonfly dreaming.  I love dragonflies and I really like bees too so the Dragonfly Dreams Bundle is perfect for me.

I've had a quick play with this set and actually created this card for Global Design Project Challenge but decided to use a different card for my entry instead.  If you haven't joined in with the challenges yet I urge you to give it a go, it works wonders when you've lost your creating mojo.


I then decided to make the card using a different range of colours as I wanted to use blue and green on the dragonfly wings. 


Of course I had to add some silver Glimmer Paper to make the dragonfly pop.

Cardstock - Sahara Sand, Crumb Cake, Night of Navy, Cucumber Crush, Whisper White, Bermuda Bay, Glimmer Paper, Succulent Garden DSP
Inks - Cucumber Crush, Versamark, Coastal Cabana, Black
Black Embossing Power, Brick Wall embossing folder, white baker's twine
Stamps - Dragonfly Dreams, Awesomely Artistic


STAMPIN' UP OH SO SUCCLENT LOVE

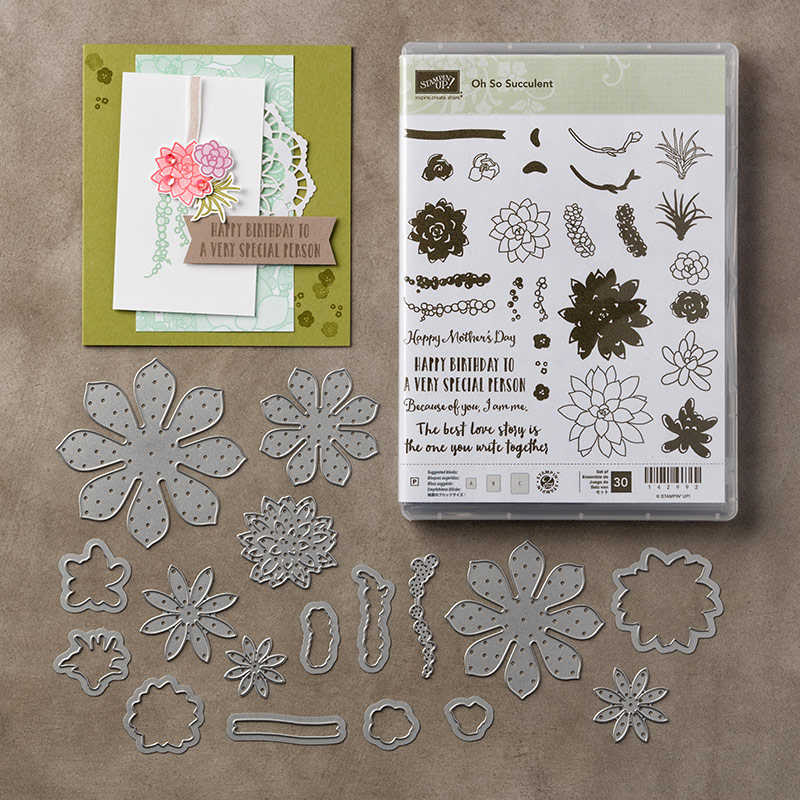
I'm loving the Oh So Succlent range which is a new release bundle in Stampin' Up's Occasions catalogue for 2017.

After breaking in the stamps with some random play,  I decided to CASE the photoshoot on page 20 along with some of the sample cards.  (CASE means Copy, Adapt and Selectively Edit)  I just happened to have some leftover mini paper pulp pots originally bought for gardening that are perfect for 3D succulent projects.


The card in the photo is one I created for the latest Global Design Project challenge "CASE the designer" who this week is Jess Williams #GDP068.  Want to know more about Global Design Project challenges then follow this link and join in. http://www.global-design-project.com/

 Guess which one is real?  Haha.

Without further ado, here is the vignette I created for my photoshoot. 

Some of the cards are copied straight from the catalogue and others are my own creations which I've posted below for your enjoyment.

 Succulent Wall

Kodedama Echeveria
 
 Wreath Echeveria

There is such a variety of colours amongst the Echeveria succulent family that you can play and experiment to your hearts content.  I decided to create a "Black Prince Echeveria" using Old Olive cardstock and Rich Razzleberry ink. 


As you can see, you do need a few layers to make the plant look realistic.  The addition of Rich Razzleberry combined with Chocolate Chip cardstock certainly helps to create a moody card that is so suitable for both females and males.

Cardstock - Whisper White, Old Olive, Chocolate Chip, Sweet Sugarplum, Tip Top Taupe, Kraft, Sahara Sand, Mint Macaron
Ink - Old Olive, Tip Top Taupe, Rich Razzleberry, Soft Suede, Mint Macaron, Sweet Sugarplum,
Brickwall embossing folder, Succulent Garden DSP, Swirly Birds die, Succulent Framelits Dies, Dragonfly Dies, Live Love Grow stamp set..

Wednesday, January 4, 2017

KOKEDAMA

Have you jumped on the Kokedama craze yet?  Well the new Oh So Succulent stamps from Stampin' Up certainly give you the opportunity to do so without getting your hands dirty.

After stamping and die cutting some of the images I decided it was time to make a 3D succulent.  I've been seeing so many examples on the net and they're also scattered over the front cover on the new Occasions Catalogue which was released to the public yesterday.

I think this one resembles an Ecchiveria plant so decided it would make a great kokedama.  I can see this bundle quickly becoming a favourite.


Cardstock - Mint Macaron, Whisper White and Tip Top Taupe
Succulents Framelits Dies
Ink - Tip Top Taupe, Sweet Sugar Plum, Bermuda Bay and Soft Suede
DSP - Succulent Garden


Tuesday, January 3, 2017

#GDP068

Here's my card for the current Global Design Project challenge CASE the designer who just happens to be Jess Williams.  Just in case you don't know what CASE means it's Copy and Selectively Edit.


Cardstock colours I've used are, Whisper White, Old Olive and Tip Top Taupe and of course I'm into the succulent craze so I just had to play with the new Oh So Succulent stamp set and a couple of the  coordinating Succulent Garden DSP's.  The greens look so lovely with a little pop of Watermelon Wonder.  My little dragon fly is the top portion of one of the Detailed Dragonfly Thinlits dies and is mounted on a clear acetate strip to give the illusion he is hovering over the plants below.